This is an old revision of the document!
Using WeatherDuino Pro2 PLUS to upload data to a website database with SQL
By PalmyWeather
Using WeatherDuino Pro2 PLUS to upload data to a website database with SQL
(Available in Receiver Software Release v6.x onwards)
A Brief “How To” Guide. Please note that this is not a “one for all” guide, settings may be different depending on your server.
Step 1: Set up the database on the web server
- Log into your website’s control panel.
- Navigate to “MySQL® Databases” on your server.
- Create a new database if you have not already got one you would like to add to.
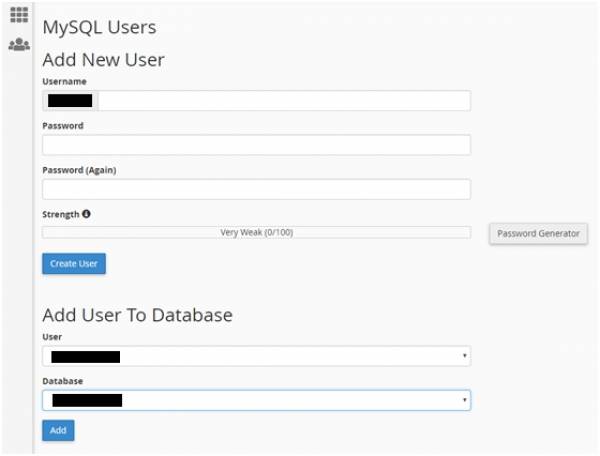
- Navigate to “MySQL® Users”, usually found as part of the “MySQL® Databases” settings.
- Create a new user if you do not already have one set up.
- Create a user name
- Create a password
- Select the database you would like that new user to be associated with.

Step 2: Enable remote control (This step may not be required)
For security, by default the web server will be protecting itself from remote unauthorised access which could modify or damage the data. Permission may need to be granted to allow your IP address assigned by your internet provider to write to your databases remotely if you host is not local.
- Using Google, search “What is my IP address?” and it will typically return with your IP address assigned by your internet provider. Note this number which should be 4 groups of numbers separated by decimal points. EG: XXX.XXX.XXX.XXX .
- From your server’s control panel, navigate to “Remote MySQL®”.
- Enter your IP address into the “Add Access Host” and save it to the list.
Step 3: Setting up the database structure / creating a new table
Now a table to store all the data in needs to be created within the newly created database.
- Open up the database admin. This may be called something similar to “phpMyAdmin”.
- Click on the database you would like to add the table to.
- Find “Create Table” and give the table a meaningful name. For this example, we are going to be saving the air quality data, so naming it “AirQuality” would probably be best.
- Count out the number of columns you will need for the data you will be saving – do not forget one for the date/time either.
- Once the table is named and created, the columns will next need to be named and parameters set. This is where things get a little more difficult.
- Save the results. Now a empty table within your database is ready to accept data.
- Here is an example of the Air Quality table with the columns named and parameters set.
Additional columns can be created later on and parameters changed if the settings are not right first time around.

Step 4: Configuring the PHP Scripts
Provided in the “Receiver Software Release v6.x” package are two files titled “AirQuality_LogToSQL.php” and “db_rw_details.php”. These need to be configured to match what has just been created on the server.
- Open “db_rw_details.php” and set the credentials. Remove the X’s and replace with your personal details between the quote marks.
- $key =“xxxxxxxxxxx”; - This is a “handshaking” code which will be checked when data is passed from the outside source to ensure it is legitimate.
- $dbhost = “127.0.0.1”; - Usually does not need to be changed. The IP address could be replaced with “localhost”.
- $dbuser =“xxxxxxxxxxxx”; - This is the username which was setup in Step 1 of this guide.
- $dbpassword=“xxxxxxxxxxxx”; - This is the password which was setup in Step 1 of this guide.
- $database =“xxxxxxxxxxxx”; - This is the name of the database which was setup in Step 1 of this guide.
- Open “AirQuality_LogToSQL.php” for configuring this file.
- Locate and update the “include” line in this file. This is used to point the path to read the credentials set in the “db_rw_details.php”. It is best if these two file are not located in the same folder for security reasons.
An example of this is: include ('/home/weather/data/scripts/db_rw_details.php'); - Locate the timezone setting and update this to your location. The following website can help choose the best timezone name to use for your area: http://php.net/manual/en/timezones.php .
Example of this is:date_default_timezone_set('Europe/Lisbon'); - Choose the path of where the text log should be stored. This is a one line text file which get updated each time the data is uploaded to the website. For example:$logfile = './logs/AirQuality_Log.txt';
- Save and upload these two files to your chosen directories on your website.
Step 5: Configuring the Software of RX Unit
The final step is to change the settings on the RX software so it knows where to access the files that have been uploaded to our website.
- Navigate to the “Credentials.h” file.
- Update the “My Server Credentials”.
- Under “My_Server”, enter your website address. NOTE: Do not use a leading http:// as this will not work.
- Under “Path_To_LogToSQL_PHPfile”, enter the path to the “AirQuality_LogToSQL.php” file on your website.
- The “MYSERVER_KEY” is where your “key” set under Step 4 is entered. This is the “handshaking” code which will be checked when data is passed from the outside source to ensure it is legitimate.
- Within the “Config_Options.h” file, the “ENABLE_AQM_TO_MYSERVER” will need to be enabled by changing the “0” to a “1”.
- Assumptions have been made that WiFi has been enabled and configured already within the RX Software settings. This is also a requirement if it has not been enabled.
Once the RX software is compiled and uploaded, it should now start to upload data to the database. This can be checked by logging into the database admin where the data can be viewed.
The data can now be pulled from this database for such things like producing graphs on the website and for many other purposes.
There is a lot of potential going forward for this to not only upload data for the Air Quality monitor (which at time of writing is the only publicly supported option). In the future, this concept could be used to upload all the data gathered by the weather station and have the weather station save the data directly into the database making it a free standing product.