This is an old revision of the document!

WeatherDuino Snow Height Sensor
Overview
The snow height sensor was built to determine automatically the current snow height. Since transmission protocol of the WeatherDuino is not intended to have a snow height variable, a small work around is necessary. This means that the sensor software emulates another sensor which has to be read by a separate TX unit. The snow height is then transmitted as “humidity” variable which can be mapped as an extra sensor.
Features:
- Automatically determines the current snow height
- Emulates a HTU 21 temperature sensor for use with a standard WeatherDuino TX board
- Snow height can be mapped to an extra humidity to get the readings into your favorite weather software
History
Over the last years, I had different approaches to determine the current snow height automatically. Beginning from an array of photodiodes, followed by flood marker and a camera and so on…
The bad thing was that I could only test it in winter so my efforts consisted of half a year of thinking, then getting nervous because winter was coming so quickly and my test setup was not ready, followed by some disappointment because my system did not work properly.
Since I knew that professional devices work with a laser ranging system my final idea was to get a commercial laser distance meter and combine it somehow with a microcontroller to transmit and process its reading. This was the day everything turned well and I got the first good measurements in winter 2016/2017 and I was able to tune the system in winter 2017/2018. Also last winter my idea was born to find a solution for integrating it into the WeatherDuino system because I wanted to switch with my PWS to this platform. If you have a community, supporting and giving feedback some things are much easier.
After testing and debugging another summer, I now can proudly present you the automatic snow height measurement system for the WeatherDuino.
false
Hardware assembly
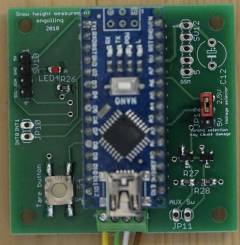
Purchasing a snow height measurement PCB you get the following part:

| I²C interface | used for connection to TX module and power supply |
| voltage regulator | provides 2.5V for the HIREED LASER |
| voltage selector | changes voltage to 2.5V or 5V on the LASER interface |
| level shifter | converts voltage level from 2.5V to 5V in case you use a HIREED LASER |
| tare button | allows you to save the actual laser reading in the EEPROM to zero the snow height |
| LASER interface | Communication interface to the LASER ranging device |
| reserved | some space for future ideas |

A fully assembled snow height measurement board may look like pictured on the left.
Like all PCBs of the WeatherDuino system, you are free to install the connectors you prefer.
Be careful that the jumper for voltage selection is always set to 2.5V when using a HIREED LASER!
Since the Arduino and the LASER device have to talk to each other, the TX wire of the LASER has to be connected to the RX wire of the PCB and the other way round!
Supported LASER ranging devices
| HOLO Laser NS-20 | HIREED Laser HI-50 |
 |  |
| - Operating voltage: 5V - Display to show latest reading | - Operating voltage: 2.5V - Integrated temperature measurement (not very precise) |
| Can be bought as bundle with the PCB | Is available for example from Ali Express |
Important note for the HIREED LASER.
To work properly the device has to listen to exactly this protocol:
Communication interface: serial communication (TTL), 19.2K, baud rate parity bit: no parity, data bits: 8;
Function: send capital letters “O” to open the laser, capital letters “C” to close the laser, capital letters “D” (Slow) or “F” (Speed) for measuring distance, capital letters “S” to view the module temperature and power supply;
Source of specification: Ali Express last time tested on 11.11.2018
Preparation for the HIREED LASER
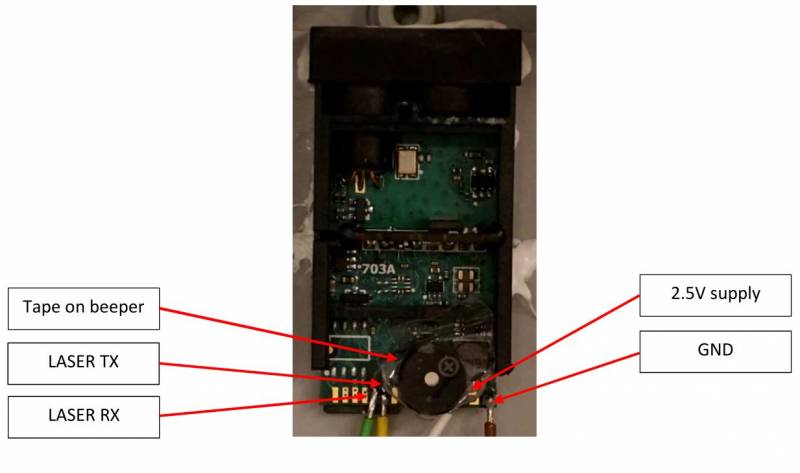
The wires for RX, TX, ground and supply have to be soldered onto the laser PCB as shown on the picture.
Please check further information of your device to confirm that the pinout is still the same.
I recommend putting some glue or tape on the beeper hole since it is very loud.

Preparation for the HOLO LASER
The wires for GND, RX and TX are already soldered on the PCB, the wire for the supply voltage has to be added.
For energy saving the display connector can be disconnected.
I recommend putting some glue or tape on the beeper hole since it is very loud.

Hardware Setup
Since the snow height measurement sensor will be located outside on a free position, it is subjected to rough environmental influences such as rain, ice and especially UV rays. I can recommend any metal housing or for example the Rittal PC 9508.000.
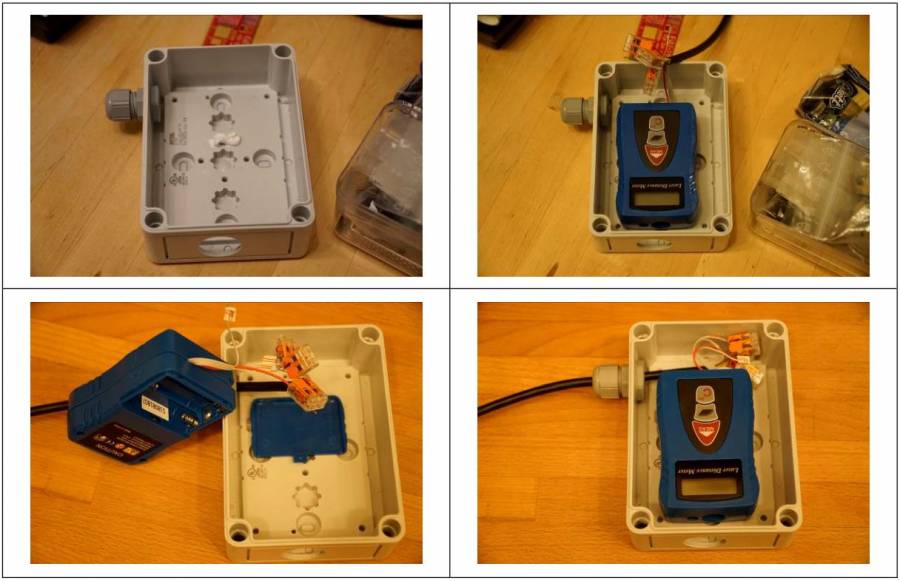
I just glued the laser inside the housing and drilled a hole for a M16 cable gland and another hole where the measurement LASER beam can get out. The hole can be sealed with real glass or PMMA glass or similar. Since it will not be directly exposed to sunlight, UV stability is not that crucial. You should only use a suitable glue that the housing is being sealed properly. You might put some silica gel into the housing to prevent condensate. Make sure it is really sealed properly, otherwise the hygroscopic properties will lead to even more water in your housing.
 So it might finally look similar to my first prototype, which has already survived two winters and summers and still works fine.
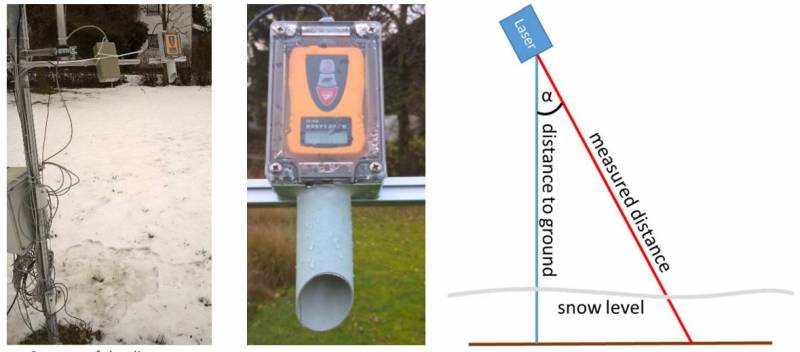
Another important part is the mounting on the mast. Since the housing should not shadow the ground at the measurement point the LASER has to be mounted in an defined angle α. Otherwise the falling snow might be blocked by the housing and the snow would not reach the ground, leading to a wrong measurement. The angle α should be around 15°, the higher your laser is mounted the more crucial it is that the angle is determined correctly. This angle has to be entered in the software to ensure a correct calculation. More to come in the software part of this manual.
After the system is mounted correctly and has booted completely you should press the tare button to write the current mounting height as tare value to the EEPROM of the Arduino Controller on the PCB. Be careful that there is no grass or something similar distorting the measurement to the ground.

Software setup
The related software is constructed analogous to all of the WeatherDuino software modules. So it should be pretty easy to work with it.
All options can be configured in the tab Config_Options. All options should be self-explaining. The only think you should be aware is the correlation between scanning time and filter depth.
Since I am using a median filter you might get a maximum delay of filter depth times the scanning intervals divided by two. This happens if you have a constant decrease or increase of the snow height. So the more you smooth your readings the more delay you get.
For example you might take a reading every five minutes and you have a filter depth of 20. This means it takes:
5 minutes per sample * 20 samples = 100 minutes
to update each value in the filter.
If it is snowing steadily and each of your reading is correct the samples will increase each time. That means you might have a delay of 50 minutes in snow height measurement.
On the other hand some conditions might occur that don’t allows correct measurements for some time like very heavy snowfall or reflections of already fallen snow. I did not investigate those things, but I want to say that it’s important to choose the parameters according to your needs. I suggest a ratio that the filter is renewed between 40 and 60 minutes.
**Further support und buying information may be found in the support forum.**